Showing posts with label diy - 改造.轻装修. Show all posts

Tuesday, February 25, 2014

DIY hemp string hanging lamp

Wanted to make this lamp ever since I saw it on pinterest.
After a looong search, finally found the hemp string needed at Mr. DIY shop.

And so the project begins...


Have all the materials ready: 

1. Glue 
2. Hemp string
3. Balloon/ inflatable ball (It should be the size you expect the lamp to be)
* I chose balloon so I can control whatever size I prefer
4. Newspaper to avoid the mess
5. Something to station the ball ( I just taped it to a basket)


1. Rub glue on the hemp string part by part, and start wrapping it around the ball.
You can also get a disposable plate and dip the string in glue instead of applying it to the string by section.

2. After almost and hour of wrapping, the lamp shade is done!!
In case you're wondering why the balloon colour is different, 
the white 1 burst in the process and I gotta start over with a new one. T_T
That's the drawback of using a balloon I guess....

3. Leave the lamp to dry until the shape is fixed. 
I left mine for one day. Then deflate the balloon. 

4. Pull the light source through the centre and fix it.
(I just tie mine with the remaining hemp string)

For the light, you can get a ready cord set and just fix the bulb, 
or get the parts (wire, socket, bulb) and assemble them yourself. 


Finally, hang your lamp wherever it's intended. 
And voila!! A personalised DIY hemp string lamp is completed  ~
I'm very happy with mine and it all costs less than RM15 


Monday, January 21, 2013

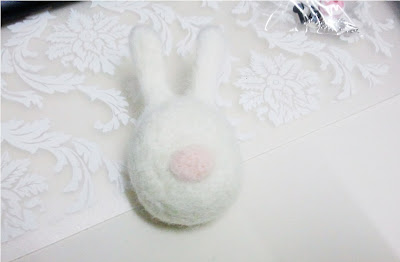
DIY: daiso wool felt bunny

Saw some wool felt animal crafting kit at Daiso for RM5. 
Got this cute bunny to be my first wool felt project. :)

Everything needed for the project is included:
wool, felting needle, accessories (eyes, beads, chain etc)

There's even extra ones for some of the tinier accessories. 
In case some got lost.

1. Roll the wool into a ball shape. Still a big round shape now.

2. Start felting. The process is just repetitively pricking at the wool.
The wool got smaller and firmer into a tiny ball. That's the bunny's head.

3. Next up is the ears. Roll 2 long stripes and felt into ears.
Leave the end without felting so it's still soft and furry.
Attach the  furry end to bunny's head and prick those into the head so it get's attached.

So far so good! :)

4. Rolling the pink wool into nose and mouth is the craziest part.
Things got out of hand at this point. >o<
The bunny's head kept rolling around so the nose got felt all over it and end up in a big lump.


5. Attach the eyes and bead for body. 
Voila! My first woolen felt bunny.
Quite pleased with myself except for the nose part. :p 

If you like handmade and crafts I think the kit is a good thing to get.
It's basic and mini so beginners won't get overwhelmed, 
plus it's cheap so you can always get another one if the first one didn't work out. 

Sunday, November 6, 2011

简易完成之随兴懒人窗帘

从几年前看了手作书籍,也想动手做些布杂货,
就开始囤积了很多布料, 结果都被堆在抽屉里被遗忘。

趁着这次房间改造的热情,
把其中两匹拉出来,替代对了多年还没产生感情的闪亮玫瑰窗帘。


凡事都想方便的我还没开始就在想shortcut了。
以下就是经过反复思量后,最简单的制作法。


1. Jusco 文具部买的file ring 和纸夹,二合一 combine 起来,
变身窗帘夹。不到 RM10。


2. 量布和剪出窗口的长X宽。记得每边预留额外长度, 约4cm。
(我用 agak 的, 都说了叫随兴窗帘,总之长过窗口没关系,
短过就不好了(窗口会很尴尬的)

3. 把预留的边边缝起来。

4. 把缝好的布用step 1 的夹子夹起来。滑进窗帘杆里。
完成!!


想开窗时用妹妹不要的珍珠项链绑起来,
虽然对我来说稍嫌女性化, 可是与其买新的还不如物尽其用啊!
有时间再做个另一个替换。: )


Monday, October 24, 2011

浴室门之拯救行动


自从粉刷了feature wall 后,
就对颜色很莫名其妙的浴室门越看越不顺眼。
决定一鼓作气把它也解决了。

因为浴室门是类似 plastic 的滑面材质, 
所以上色前还要费功夫的做前置作业。(用砂纸把表面磨粗)


*暧昧的青色


要我徒手用砂纸磨是不可能的了。 
所幸给我借到了电动磨砂机。用了几个小时,
震得我手发麻,耳朵快聋了才把表面磨好(其实是磨坏): p
 
*帮助完成这项拯救行动的得力功臣


不想多花钱,
在 store room 翻找时被我发现到用剩的白色油性漆。
用来刷门正好!!

可是油性漆不像刷墙的水性漆好刷,而且有很重又难闻的气味,
需要不时让发酸的手休息一下还有出去呼吸新鲜的空气。

就这样刷了又停, 停了又刷,从天亮油到天黑,
累到快虚脱了才油完。现在想起还心有余悸...=.="

上了漆后, 收拾和洗刷也让我折腾了一晚上。
之后还要流离失所(寄宿妹妹的房间), 让房间空置几天,等漆味消散才可以回归,
堪称我 DIY 史上最刻苦的工程。

还好,
出来的效果让我十分, 非常,超级满意!!
每次看到脱胎换骨的它都让我超得意的。 ^O^
 
*变身人见人爱的乡村风木门

 顺便分享下网上搜寻来的去油漆味的方法:
1. 在房里点蜡烛
2. 装盆清水或加了醋的水 
3. 摆放茶叶或面包

Feature wall上妆之粉饰太平

今年六月,趁着等开新工的一个月假期,
决定动动手给房间来个小改造, 换换心情。
原本房间是四面白墙,经过多年也不白了,
选个feature wall, 刷上颜色, 正好掩饰岁月的痕迹,顺便美化一下。
听说紫色能帮助睡眠(本来也没有睡不着的困扰),让人平静(这个我需要)
 所以紫色当选了~

*before~  惨白的墙

在某个早晨, 我带着铁一般的意志克服了最艰难的任务 ~
把家具移开。
然后用了整个下午把墙刷完。
(因为偷懒只刷了一层,油漆干后才发现油得不均, 这是后话了)T_T

*风干中

完工后, 看着自己的杰作真的很有成就感!
虽然不完美,
可因为是自己努力的成果, 特别有感情。
也激发了过后一连串的diy project。

*锵锵锵锵~ 完成图